How to Freeze Dry Hash
How to Freeze Dry Hash: The Complete Guide to Sublimation and Solventless Extraction
The art of making hash has evolved dramatically over the last decade. While the traditional methods of air-drying resin heads over cardboard boxes have their nostalgic charm, modern solventless extraction demands precision, preservation, and purity. If you are washing high-grade fresh frozen cannabis, exposing those delicate trichomes to oxygen and room temperature for a week is no longer the standard. The modern standard is freeze-drying.
Learning how to freeze dry hash is the single most important leap a hash maker can take to elevate their product from a sticky, oxidized brick to a pale, sandy, terpene-rich powder. This process, known scientifically as lyophilization, completely bypasses the liquid phase of water evaporation. Instead of waiting for wet hash to dry naturally—a process fraught with the risks of mold, terpene degradation, and color darkening—a freeze dryer removes moisture in a matter of hours within a sterile, cold vacuum.
This comprehensive guide will walk you through the entire process of freeze-drying ice water hash. From preparing your wet slurry to programming the exact shelf temperatures on your machine, you will learn the precise steps required to produce the perfect, golden, full-melt hash.

Freeze drying takes wet, muddy hash slurry and transforms it into a perfectly dry, terpene-rich golden powder using deep vacuums and gentle heat.
The Science of Sublimation
Before pressing buttons on an expensive machine, it is crucial to understand the physics at play. Freeze-drying relies on a principle called sublimation.
Normally, when you remove water from a wet substance, the ice melts into a liquid, and that liquid eventually evaporates into a gas. This transition through the liquid phase is where hash degrades. As water turns to liquid, it acts as a solvent, degrading the delicate trichome membranes. Furthermore, the heat and oxygen required for standard evaporation cause the hash to oxidize (turn dark brown) and lose its highly volatile monoterpenes.
Sublimation changes the rules of physics. By dropping the atmospheric pressure inside a sealed chamber using a powerful vacuum pump, you change the boiling point of water. Under a deep vacuum, ice does not need to melt to become a gas. It transitions directly from a solid (ice) into a vapor.
When you freeze dry hash, the machine freezes the wet slurry solid, drops the pressure to near zero, and then applies a very gentle heat to the shelves. The ice inside the hash instantly vaporizes and is pulled out of the chamber, leaving behind perfectly intact, pristine trichome heads with zero water damage and zero oxidation.
Essential Equipment
To successfully freeze dry your solventless extracts, you will need a specific set of tools. You cannot improvise this step with a standard kitchen freezer.
-
A Pharmaceutical or Scientific Freeze Dryer: These units are specifically designed for sensitive materials and allow for precise manipulation of shelf temperatures and vacuum pressure.
-
Vacuum Pump: Usually included with the freeze dryer. This requires regular maintenance and oil changes (unless it is an oil-free scroll pump) to maintain the deep vacuum required for sublimation.
-
Stainless Steel Trays: To hold the hash during the cycle.
-
Parchment Paper: Unbleached, silicone-coated parchment paper to line the trays. Do not use wax paper.
-
A Fine Metal Spoon or Hash Scoop: For collecting and spreading the wet slurry.
-
Moisture Meter (Optional but Recommended): To verify the final moisture content of the powder.
Step 1: Preparing the Wet Wash
The freeze-drying process begins the moment you pull your filter bags from the ice water wash. When you scoop the wet resin from your 120-micron, 90-micron, or 73-micron bags, it will look like wet mud or a thick, bubbling batter.
At this stage, time is of the essence. The longer the wet hash sits at room temperature, the more it will begin to grease out and oxidize. Your goal is to get this wet slurry onto your trays and frozen as quickly as possible.
Line your stainless steel freeze dryer trays with your unbleached parchment paper. Using your metal spoon, gently transfer the wet hash from the wash bag onto the parchment.
Step 2: Spreading the Hash (The Sieve or Patty Method)
How you arrange the wet hash on the trays will dictate how evenly and quickly it dries. There are two primary schools of thought here:
-
The Patty Method: This is the most common and arguably the safest method for preserving trichome integrity. Gently spread the wet hash into a flat, even layer across the parchment paper. The patty should be no thicker than a quarter-inch (about 6 millimeters). If the hash is too thick, the core will remain wet even after a 24-hour cycle. Use the back of a spoon to gently tap the hash into a uniform thickness, but do not press down hard—you do not want to rupture the resin glands.
-
The Sieve Method: Some hash makers prefer to freeze the wet chunk of hash solid first, then use a microplane to grate it over the trays before freeze-drying. While this increases the surface area and speeds up the drying time, it introduces mechanical friction that can damage the trichome heads before they even reach the machine. For premium full-melt, the flat patty method is preferred.
Step 3: The Deep Freeze (Pre-Freezing)
Once your trays are loaded with thin, even patties of wet hash, they must be frozen completely solid.
While most modern freeze dryers have a “Freeze” cycle built into their programming, many professional hash makers choose to pre-freeze their trays in a dedicated deep freezer set to -40°F.
Pre-freezing serves two purposes. First, it significantly reduces the time your expensive freeze dryer needs to run, saving wear and tear on the machine. Second, it ensures that the ice crystals within the hash are locked in place before the vacuum pump turns on. If the hash is even slightly slushy when the vacuum engages, the rapid pressure drop can cause the hash to bubble, splatter, and explode across the inside of the chamber, ruining your yield.
Leave the trays in the deep freezer for at least 12 hours, or run the internal freeze cycle on your machine until the core temperature of the hash reaches -40°F.
Step 4: Programming the Freeze Dryer Settings
This is where the science of solventless extraction requires absolute precision. If your settings are too hot, you will melt the hash, trap moisture inside, and create a sticky mess. If your settings are too cold, the sublimation process will stall, and the hash will not dry.
Every strain washes and dries differently, but there is a baseline “Low and Slow” recipe that is universally accepted for high-grade bubble hash.
| Setting | Recommended Value | Purpose |
| Shelf Temperature | 45°F to 55°F | Provides just enough thermal energy to trigger sublimation without melting the delicate trichome heads. |
| Vacuum Pressure | < 500 mTorr | Creates the extreme low-pressure environment required for ice to transition directly to vapor. |
| Freezing Time | 10 – 12 Hours | Ensures the hash is a solid block of ice prior to the vacuum pump engaging. |
| Final Dry Time | 18 – 24 Hours | The duration of the sublimation phase. Thicker patties require more time. |
Step 5: The Sublimation Cycle
Once the hash is frozen solid and you have input your settings, you will initiate the drying cycle.
First, the vacuum pump will engage. You will hear the machine pull the atmospheric pressure down from standard room pressure to below 500 mTorr (often hovering around 100 to 200 mTorr).
Once the deep vacuum is established, the machine will slowly begin to heat the shelves holding the trays. Because the pressure is so low, the ice within the hash patty cannot melt. Instead, as the shelf hits 45°F, the ice turns into vapor. This vapor leaves the hash, travels through the vacuum chamber, and instantly freezes onto the super-cooled condenser ring surrounding the chamber (which is usually kept at -50°F or lower).
During this 18 to 24-hour window, you do absolutely nothing. Do not open the release valve. Do not stop the cycle to check the hash. Let the physics do the heavy lifting.
Step 6: Harvesting the Golden Sand
When the cycle is complete, the machine will prompt you to release the vacuum and open the door.
This is the moment of truth. When you pull the trays out, the hash should look completely different than when it went in. Instead of a wet, brown mud, you should be looking at a pale, golden-blonde puck.
Take your metal spoon and gently scrape the surface of the patty. It should instantly crumble into a loose, kinetic sand-like powder. It should feel completely dry to the touch and should not stick to your gloves or the spoon.
If the hash is sticky, stretches like taffy, or feels cold and damp in the center, the cycle was too short, or your patties were too thick. If this happens, immediately put the trays back in and run an additional 12 hours of dry time. Do not jar wet hash.
Step 7: Sifting and Cold Storage
Once you have verified that the hash is perfectly dry (ideally containing less than 1% moisture), it is time to sift and store it.
Working in a cold room (ideally around 60°F or lower) to prevent the hash from greasing up, gently push the dried hash powder through a clean metal sieve to break up any large clumps. This ensures a perfectly uniform, sandy texture that is ready to be pressed into rosin or packaged as full-melt ice water hash.
Immediately transfer the sifted powder into airtight glass mason jars. Because you have just preserved the most volatile, live terpenes of the cannabis plant, this hash is highly sensitive to room temperature. The terpenes will begin to degrade if left out on a table.
Seal the jars and place them in a dedicated hash fridge or freezer. When kept in cold storage, freeze-dried hash will retain its golden color, sandy texture, and aggressively loud terpene profile for over a year.
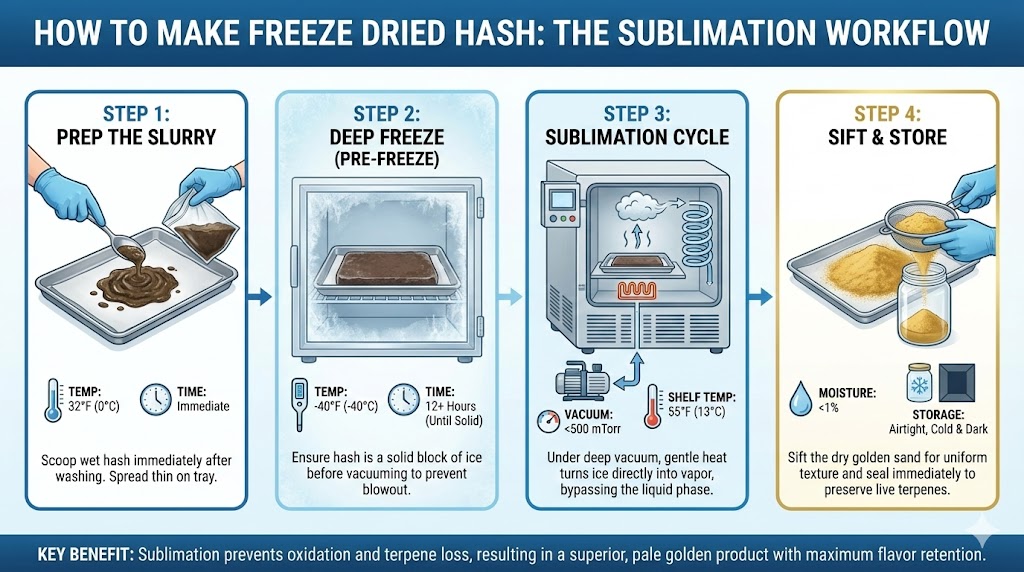
The Sublimation Workflow: A visual guide to the four critical steps of freeze-drying hash, ensuring zero oxidation and maximum terpene retention.
Troubleshooting Common Issues
Even with the right equipment, freeze-drying hash requires practice. Here are a few common pitfalls and how to avoid them:
-
The Hash Exploded in the Machine: This is called a “muffin” or “blowout.” It happens when the hash was not completely frozen before the vacuum pump turned on. The liquid water boils instantly under the vacuum, expanding the hash into a massive, sticky sponge. Always ensure a deep freeze before starting the vacuum.
-
The Hash Greased Out on the Tray: If your final product is a dark, sticky sheet instead of a blonde powder, your shelf temperature was too high. The heat melted the resin glands before the water could sublimated out. Drop your shelf temperature by 5 degrees on the next run.
-
Vacuum Error / Pump Not Pulling: Sublimation cannot occur without a deep vacuum. If your machine cannot get below 1000 mTorr, you likely have a leak. Check the rubber gasket around the door, ensure the drain valve is tightly closed, and verify that your vacuum pump oil is clean and free of water contamination.
Mastering the Craft
Learning how to freeze dry hash is the ultimate merging of agricultural craft and scientific precision. By removing the unpredictable variables of air-drying, you take absolute control over your extraction process. The result is a concentrate that truly honors the living plant—capturing the exact flavor, aroma, and effect of the strain in a perfectly preserved, shelf-stable powder.
Ready to Upgrade Your Stash?
Stop gambling on low-grade knock-offs. HashMOM is Canada’s trusted source for authentic imports and premium craft concentrates. Shop our full selection today with fast, discreet shipping.